Encountering a language barrier? Break out the Translate app on iPhone! - TechnW3
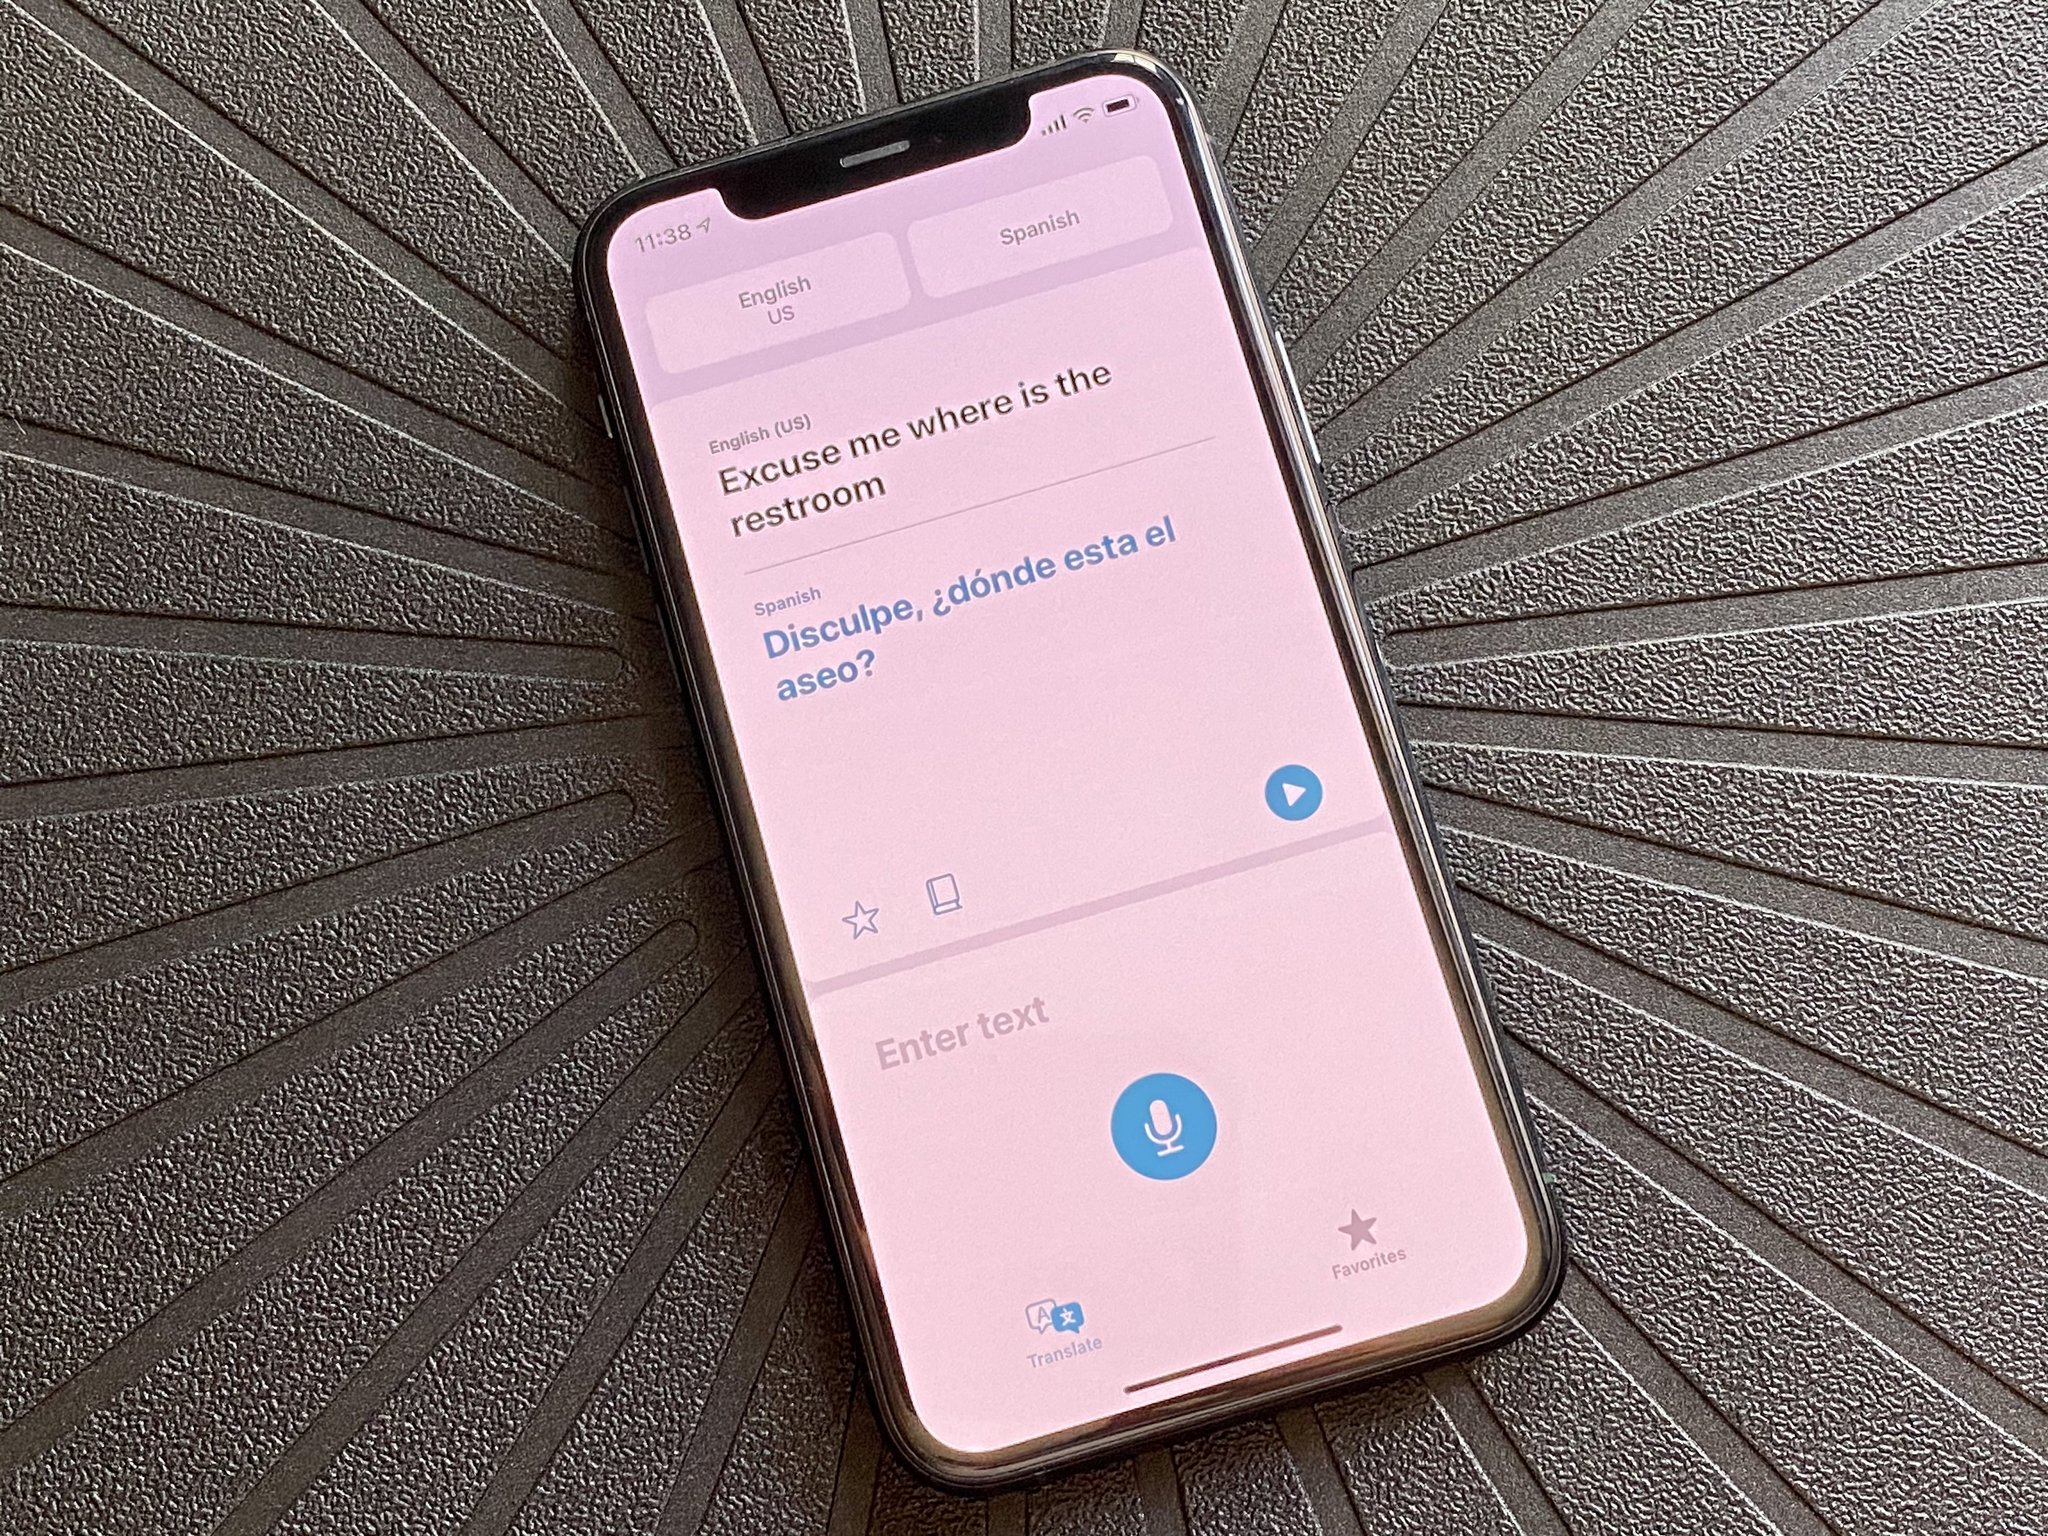
Need a quick translation when traveling or meeting new people? Just pull out your iPhone and the Translate app!
When Apple released iOS 14, we got a built-in Translate app on our best iPhone, eliminating the need to download a third-party translation app. And with iPadOS 15, Translate is now on our favorite iPad too. While a lot of us may not have done much travel lately, you never know when you'll encounter a language barrier with someone new, even if it's somewhere local.
Here's everything you need to know about how to use the Translate app for iPhone and iPad.
Requirements for the Translate app on iPhone and iPad
In order to use the Translate app on your iPhone, you need to have at least iOS 14 or later running on it. The following is a list of iPhones that will have Translate, as long as you have the correct iOS version:
- iPhone 13 Pro Max
- iPhone 13 Pro
- iPhone 13
- iPhone 13 mini
- iPhone 12 Pro Max
- iPhone 12 Pro
- iPhone 12
- iPhone 12 mini
- iPhone SE (2nd generation)
- iPhone 11 Pro Max
- iPhone 11 Pro
- iPhone 11
- iPhone XS Max
- iPhone XS
- iPhone XR
- iPhone X
- iPhone 8 Plus
- iPhone 8
- iPhone 7 Plus
- iPhone 7
- iPhone 6s Plus
- iPhone 6s
- iPhone SE (1st generation)
To use Translate on your iPad, you need to have iPadOS 15 or later. Here are the following iPad models that are capable of running iPadOS 15:
- iPad Pro 12.9-inch (5th generation)
- iPad Pro 11-inch (3rd generation)
- iPad Pro 12.9-inch (4th generation)
- iPad Pro 11-inch (2nd generation)
- iPad Pro 12.9-inch (3rd generation)
- iPad Pro 11-inch (1st generation)
- iPad Pro 12.9-inch (2nd generation)
- iPad Pro 12.9-inch (1st generation)
- iPad Pro 10.5-inch
- iPad Pro 9.7-inch
- iPad (8th generation)
- iPad (7th generation)
- iPad (6th generation)
- iPad (5th generation)
- iPad mini (5th generation)
- iPad mini 4
- iPad Air (4th generation)
- iPad Air (3rd generation)
- iPad Air 2
How to select your languages in the Translate app
The Translate app for iPhone currently supports 11 languages: Arabic, Chinese (Mandarin, Simplified), English (United States and United Kingdom), French, German, Italian, Japanese, Korean, Portuguese, Russian, and Spanish. You can select which language you're speaking, and what you need it translated into.
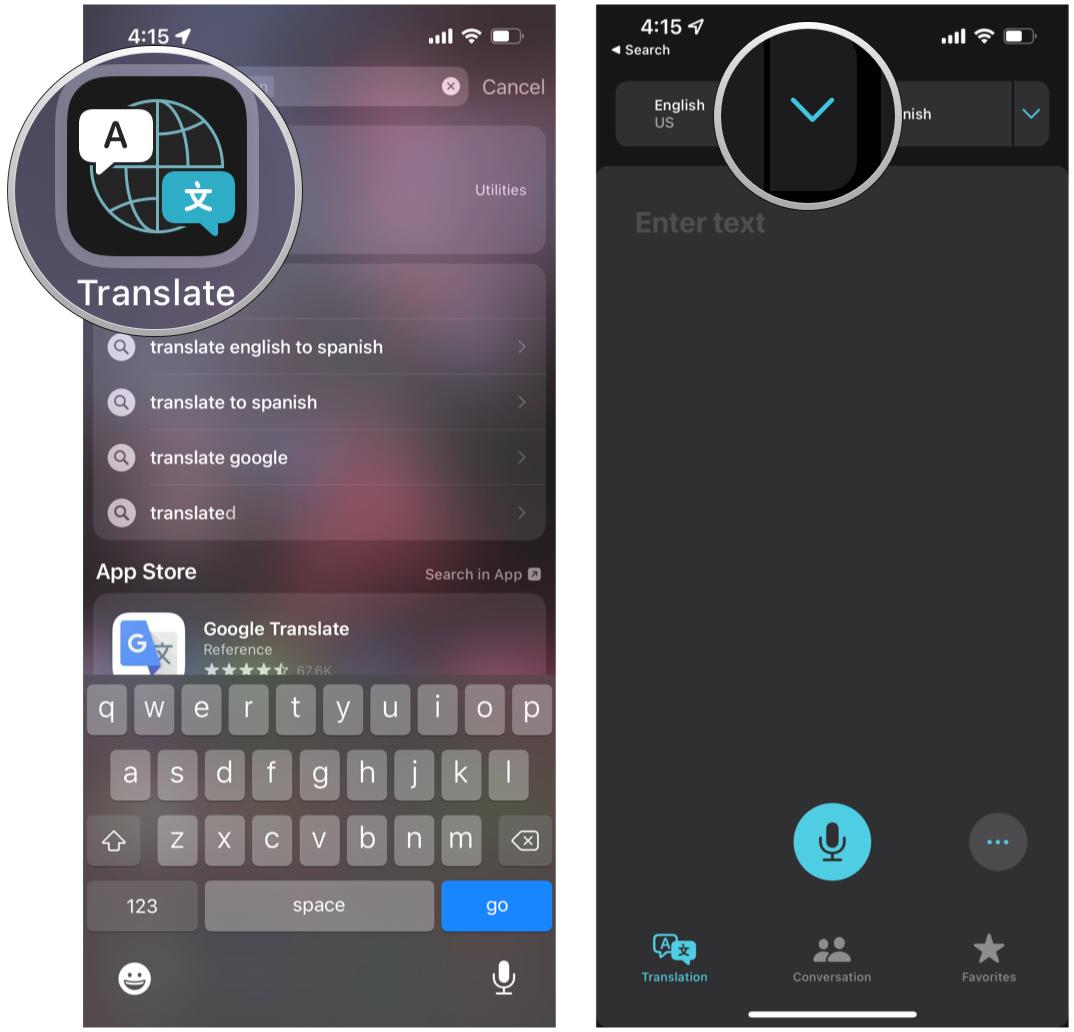
- Launch the Translate app on your iPhone.
-
To select the first language, tap the blue arrow next to the language at the top left.
- Select your first language from the pop-up menu.
- To select the second language, tap the blue arrow next to the language at the top right.
-
Select your second language from the pop-up menu.
How to translate phrases in the Translate app
Once you have chosen your preferred languages from the steps above, you are ready to start translating.
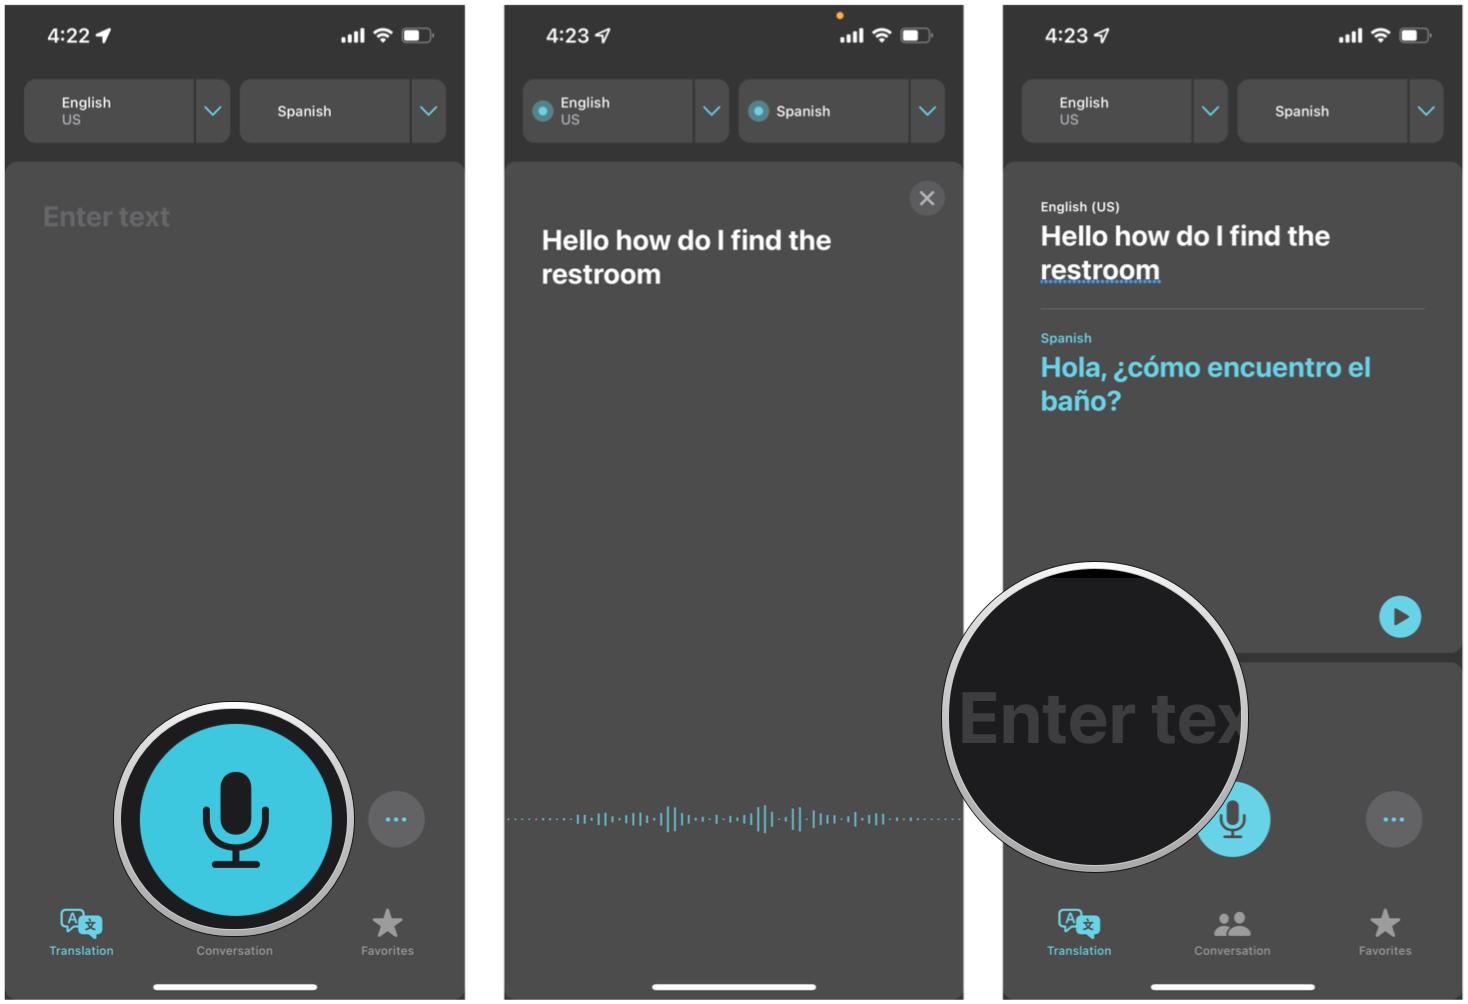
- Tap on the blue microphone button and say the phrase that you need to translate.
- The Translate app can automatically detect when someone stops speaking, and your translated phrase appears on the screen underneath the original phrase, along with an audio playback.
-
You can also tap the bottom area to type the word or phrase you need to translate.
How to favorite or pull up the dictionary in the Translate app
Once you start translating, you can bookmark certain phrases for quick reference later, or even look up dictionary definitions.
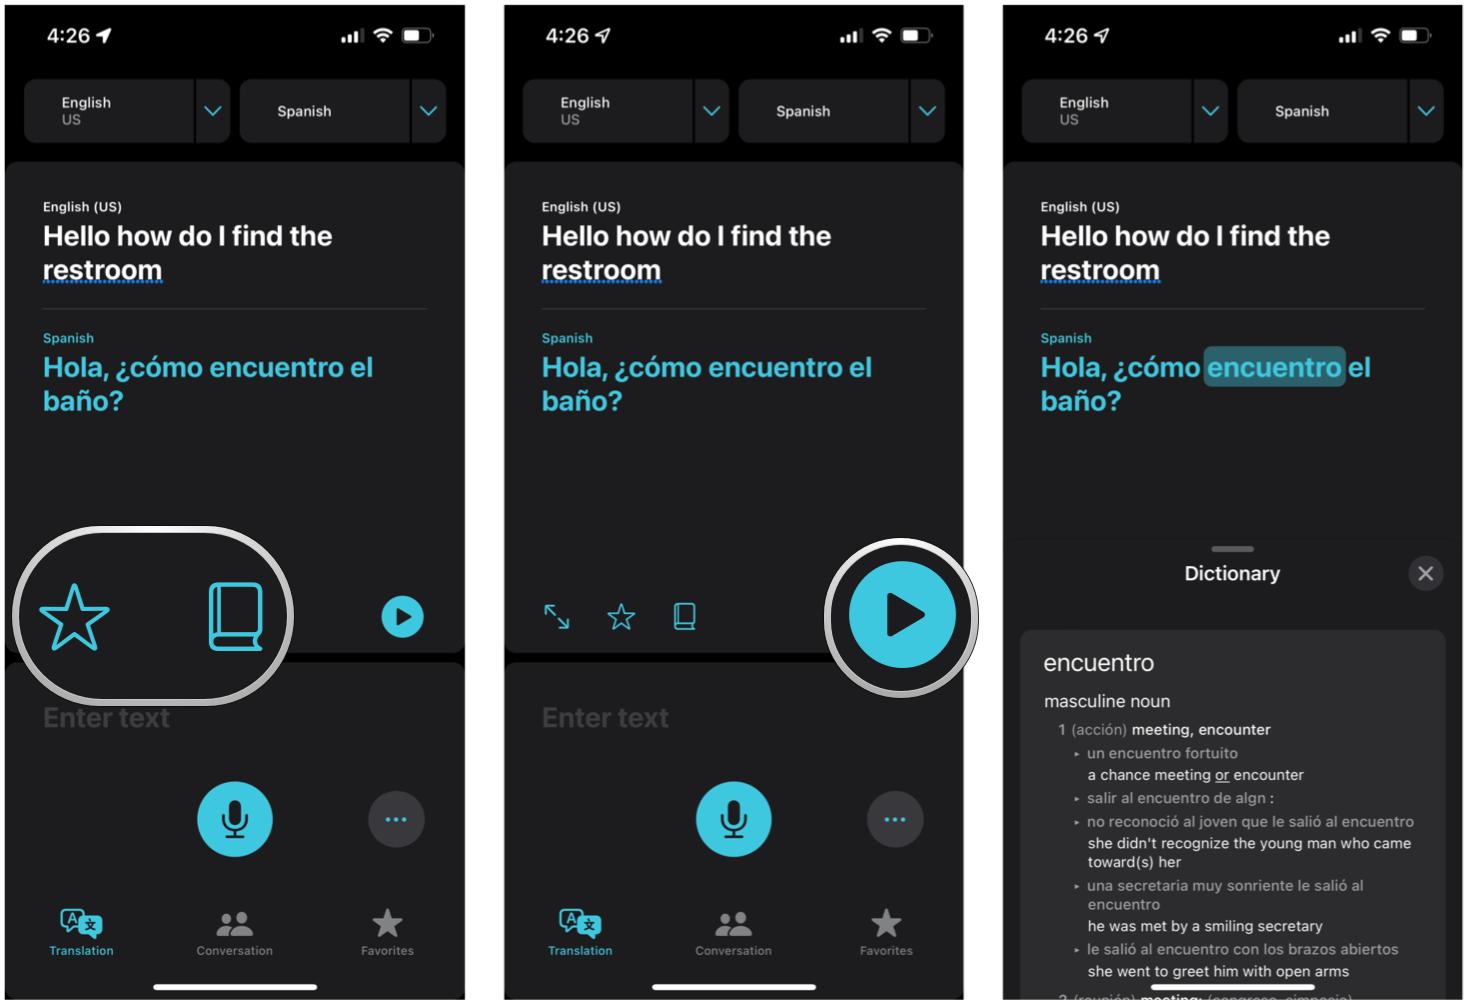
- To favorite a phrase for later, tap the star icon underneath the translation.
- To look up definitions, tap the book icon underneath the translation. You can also tap on the word itself.
-
Tap Play to get an audio playback of the word or phrase.
How to access your Favorite translations in the Translate app
When you have favorited a translated phrase, it makes it easier to pull up whenever you need it, rather than having to speak or type out that phrase over and over again. This is especially useful when frequently traveling to places where you don't know the native language.
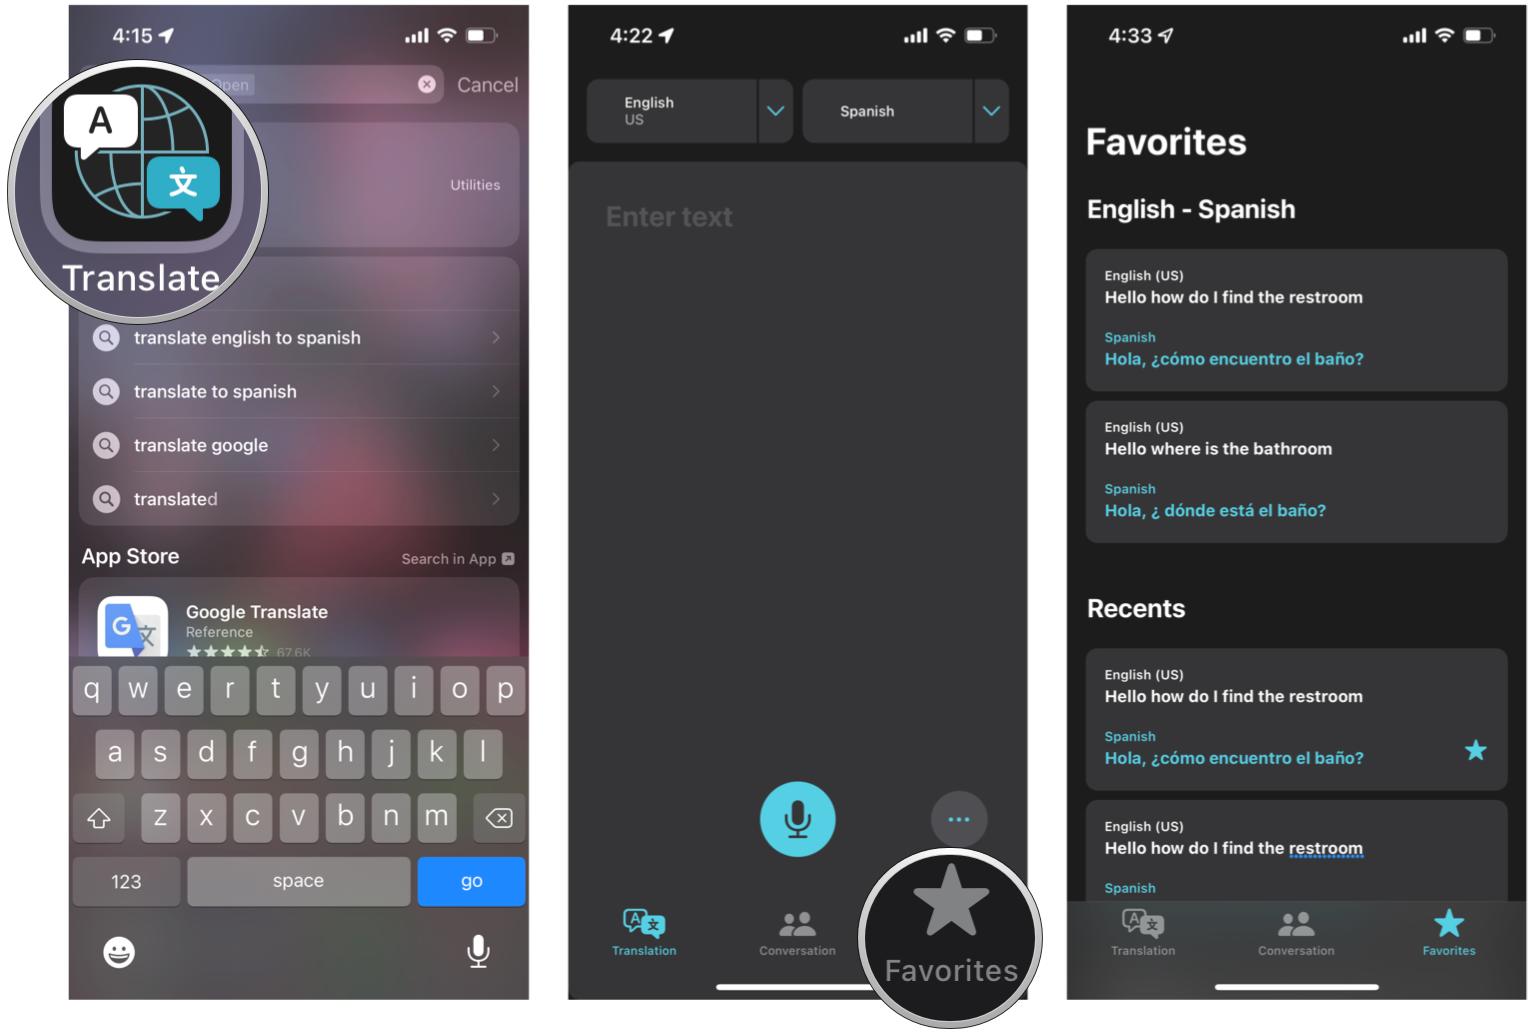
- Launch Translate on your iPhone.
- Tap Favorites tab at the bottom.
-
Favorited phrases appear at the top. Underneath is the Recents section, where you get a history of your translations so far.
If one of your favorite phrases has multiple options, you can tap on the specific phrase that you mean. This is especially helpful for things like "bathroom."
How to have a conversation translated in real-time in the Translate app
One of the coolest things about the Translate app for iPhone is that you can use it to hold conversations with someone in real-time. Here's how to do just that.
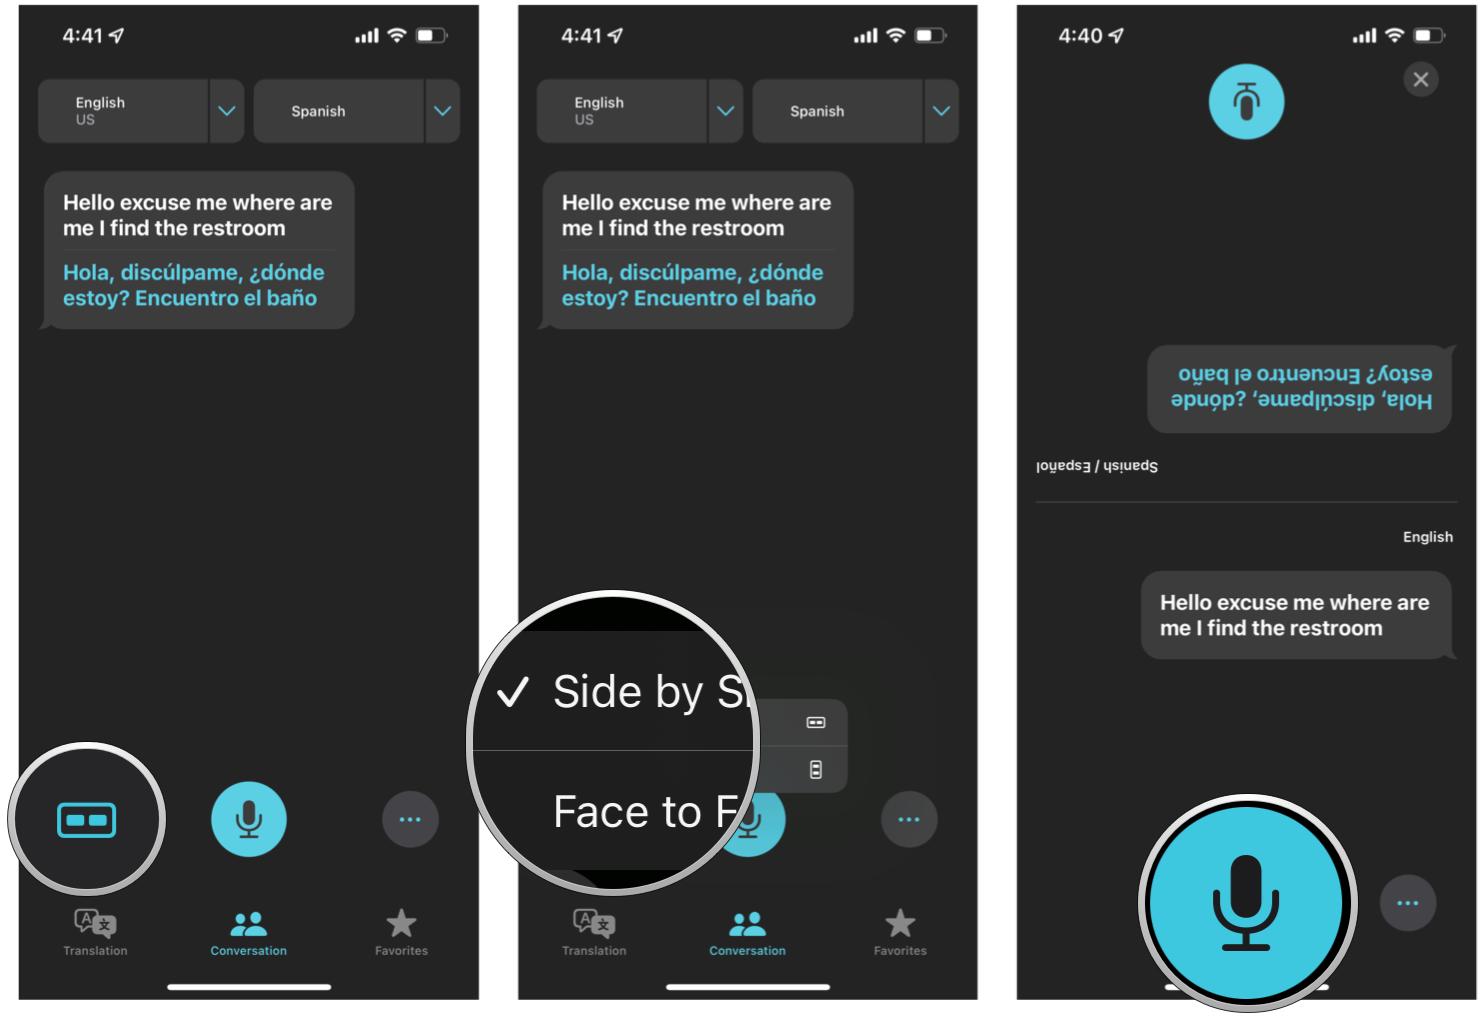
- Launch Translate on your iPhone.
-
Tap the Conversation button at the bottom.
- Tap the orientation button to the left of the blue microphone. You have two options: Side by Side (default) or Face to Face.
-
Tap the blue microphone and start speaking. Your speech will be translated in real-time for the other person and vice versa.
How to turn on Auto Translate in the Translate app
To make your life easier, there is an Auto Translate feature in the Translate app on both iPhone and iPad. This allows the app to automatically detect which language is being spoken, and it will translate accordingly, so you don't need to manually select the languages.
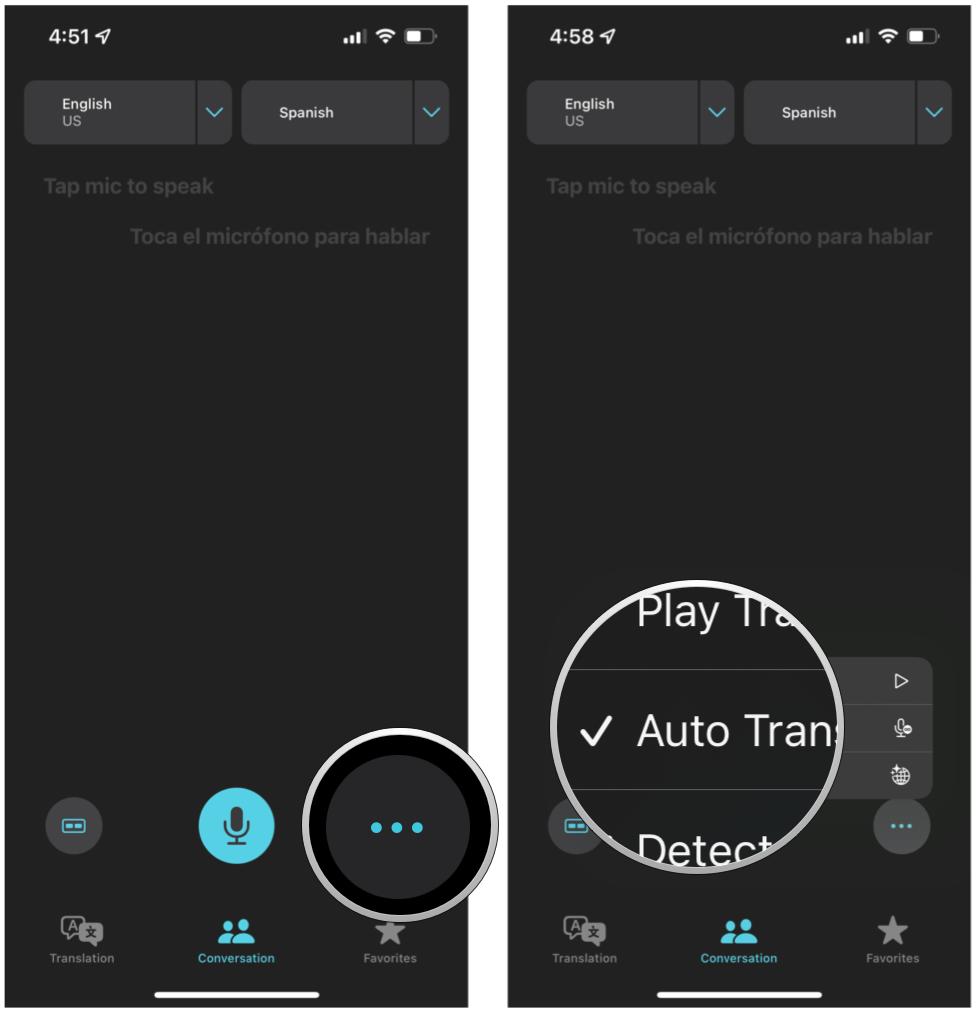
- Make sure that you're in the Conversation view.
- Tap the More button (it looks like three dots).
-
Select Auto Translate.
- You can also choose to toggle Detect Language and Play Translations from here as well.
How to download languages to use offline in the Translate app
The Translate app for iPhone requires an internet connection to work. However, you can always download the languages you need so that translation always works, even if you don't have a data connection.
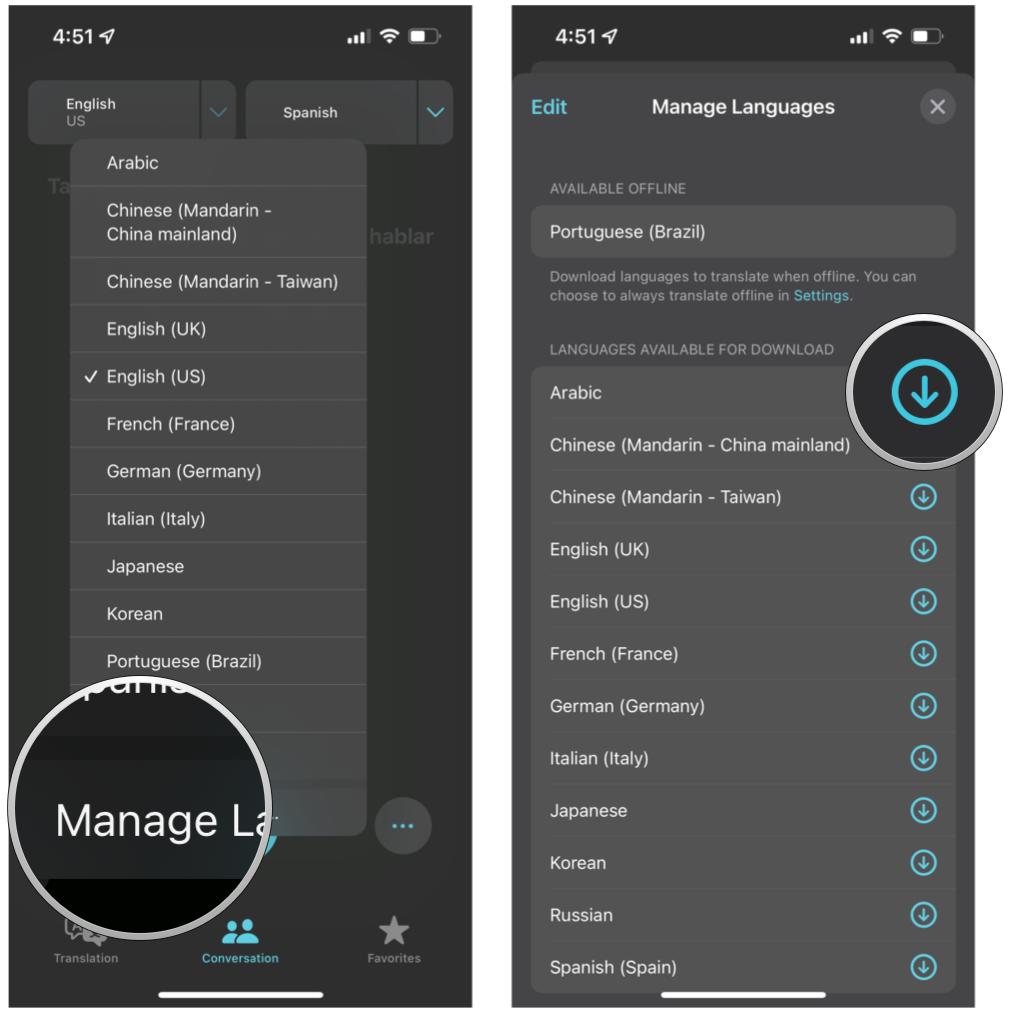
- Launch Translate on your iPhone.
-
Tap the blue arrow next to one of the language boxes at the top.
- Tap Manage Languages at the bottom of the pop-up menu.
-
Tap the download icon on the language you want to download.
Break through those language barriers with ease
Using the Translate app on the iPhone is pretty easy and straightforward. It's also fantastic that it is now built in to iOS itself, and you don't have to rely on a third-party app. Translate is an incredibly handy tool to have on your iPhone, especially if you're going to a new country in the future.
from iMore - Learn more. Be more.
via TechnW3



No comments: